I love when I visit a website and they have the customer chat feature on their website, making it so easy to request help when you need it. When I attended F8 they discussed the Facebook Customer Chat plugin, and I recently was excited to see the feature available on the back-end of my Facebook Page! Yippee! So, I jumped at the opportunity to install it (so quick and easy) and share this tutorial with you!
Why use the Facebook Customer Chat plugin?
The plugin allows your website visitors to effortlessly communicate with you (or your team) by messaging you through Messenger. The experience is seamless, and conversations that occur within Facebook Messenger will be able to be seen/continued from your desktop page, mobile app, or directly from the website. This offers a level of convenience that's really appealing!
You can also take advantage of implementing a bot. I recently signed up with Many Chat. I am currently using the free version, but I expect that I'll opt to upgrade soon!
Cool. Right?
Let's get started: Installing the Facebook Customer Chat plugin
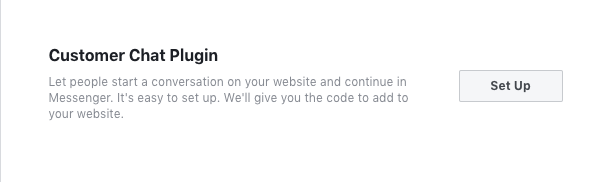
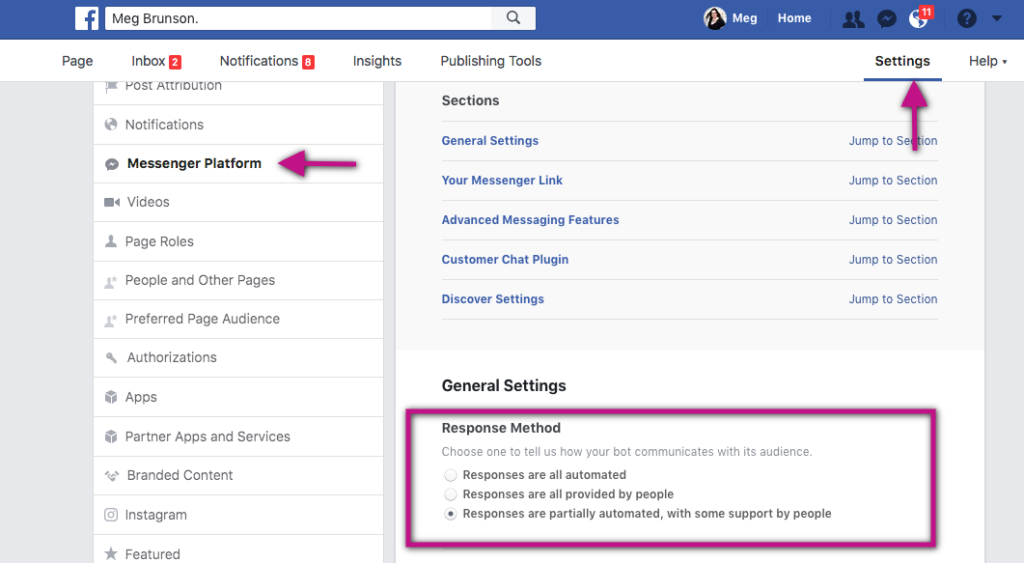
From your Facebook Business Page, navigate to the messenger platform settings by clicking first on the “Settings” option in the upper right hand side of your tool bar. Then click on “Messenger Platform” from the left-hand sidebar.
On the right, you will see “Customer Chat Plugin” and can choose to either click on the “Jump to section” link – or just scroll down until you see that header on the page.
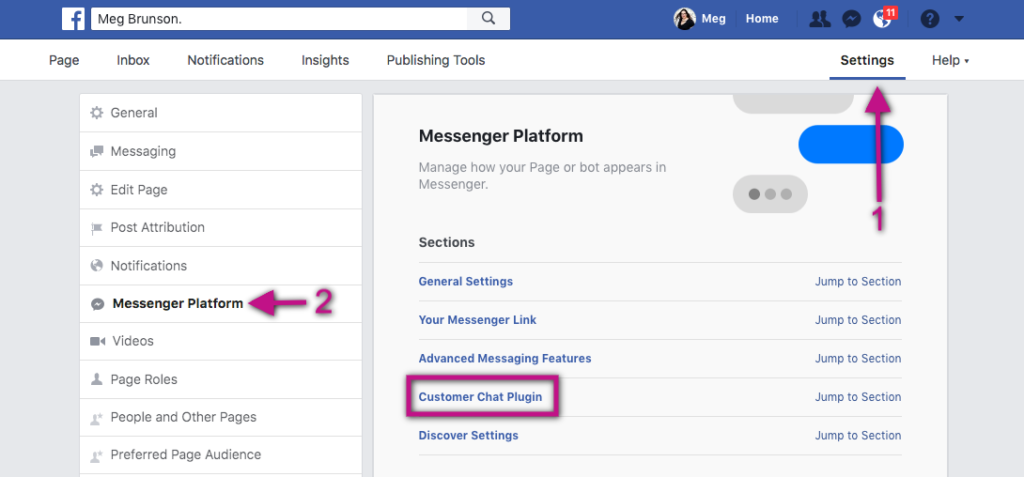
This is one of those “duh” steps… but when you get here… click “Set up.” 🙂
Ok – this is the fun part! Customizing things!!
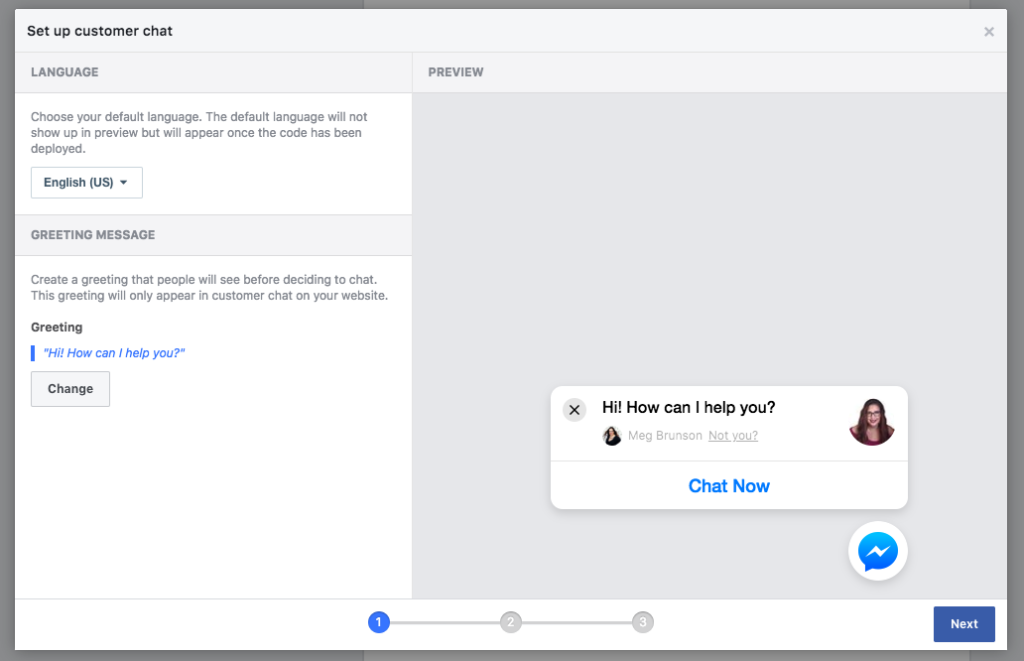
In step 1 you are able to change your language if needed, and also customize the greeting. While I did keep my greeting pretty generic (I was just excited to see it all set up, and show you!), I will go back in and really personalize this. It's important to allow your personality to shine through.
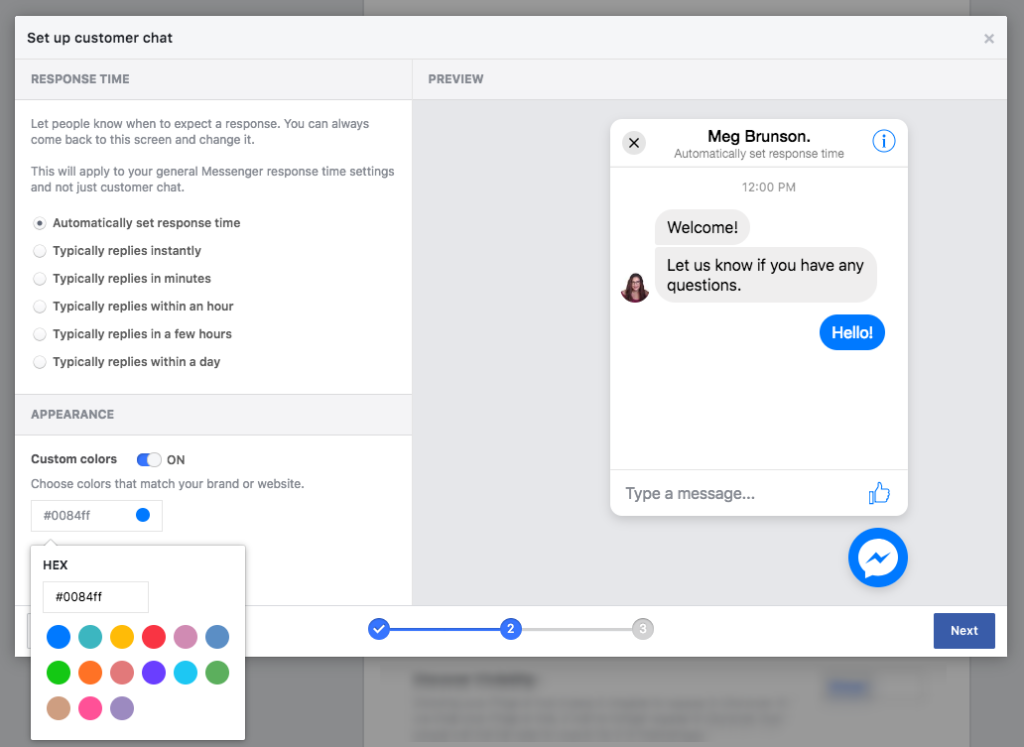
Next, step 2 allows you to set your response time and customize the appearance.
I prefer allowing Facebook to automatically set the response time. I believe that will make things the most accurate, and provide the best expectations/experience for my visitors.
You can also opt to have the appearance revert to the default, or customize the color of your messenger theme. I actually prefer the default theme because I feel like it gives a more authentic experience, making people feel like it's native to Facebook. Plus, it does compliment my theme with the default blue, since I incorporate that blue in my business themed materials. If you want to customize the color to match your theme, Facebook provides some default color options you can choose form, but you can also enter a hexcode for your specific theme colors.
When the preview looks good to you, click “next!”
Step 3 is the step that looks scarier than it is!
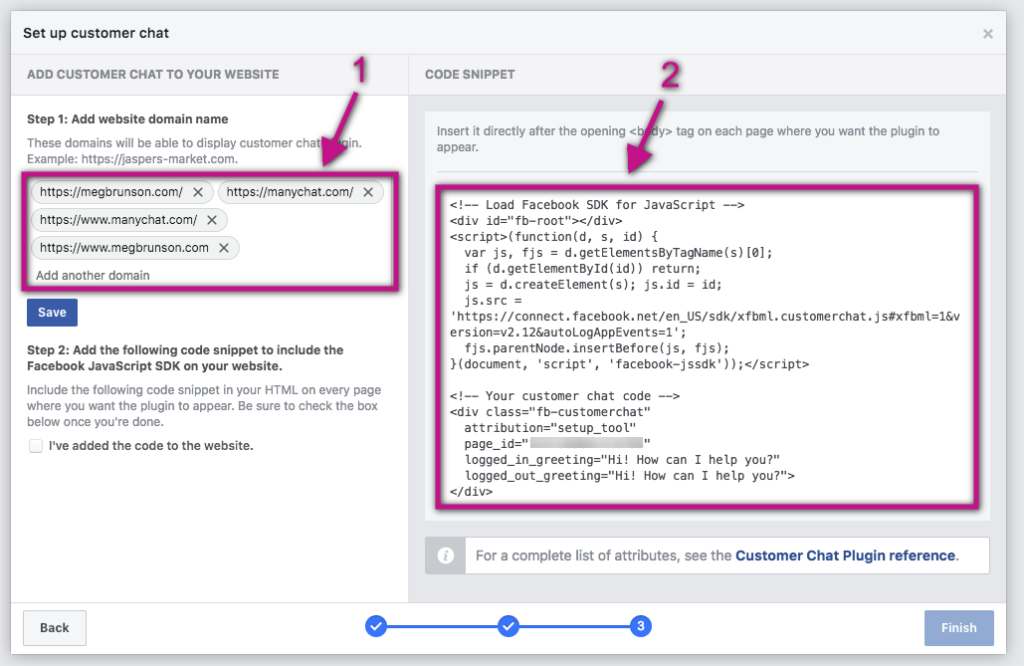
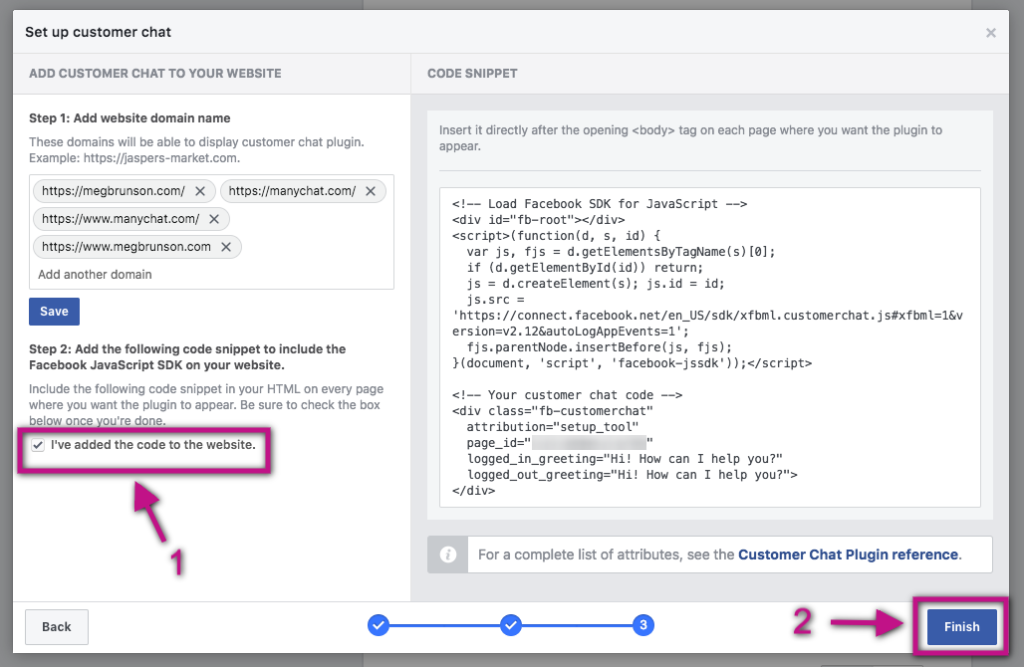
The first thing you'll want to do is make sure that your website is whitelisted for displaying your Facebook Customer Chat plugin – this is a security feature. Ensure that your website is listed here, and if you are using a third-party bot, that should be listed too (mine did so automatically). You'll notice, my website is listed both WITH and WITHOUT the www – ensure that you list your sites in the same way – to cover all of your bases!
Next, click in the big box full of code, which will automatically copy the code. As it says in the directions, you will paste this in the body of your website, anywhere you want the plugin to appear.
Because I want the Facebook Customer Chat plugin to appear on every page of the website, I will install it at the theme-level of my website.
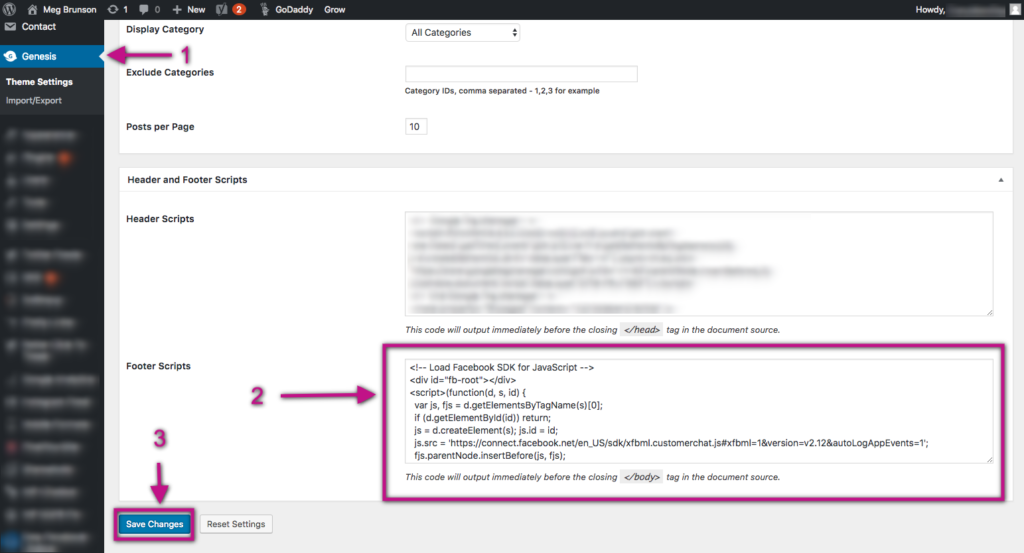
My website is hosted on WordPress.org, so that's the example you get here – but the process should be fairly similar on whatever platform your site is hosted on.
On WordPress, I navigated to the Theme Settings and pasted that code into my footer scripts.
WAIT: The instructions said to paste it in the body, right?
Yes… but… if you look closely, the footer scripts are actually installed immediately before the </body> tag – which means they are at the very bottom of the body. Now, it's true that Facebook's instructions ask that the code be placed at the top of the body… but for a wannabe developer like me, that didnt seem as easy as plopping them at the bottom of the body, so that is what I did. I tested it. It works. So, there you have it! 😉
Ok, after you've saved your changes (above), go back to the Facebook Customer Chat plugin installation, click the box indicating that you've added the code to the website, then click “Finish!”
Before testing the feature on your site – there are a couple things I recommend you double-check form your Page Settings.
The first is the response method. Indicate if all of your responses are automated (100% bot), all responses are provided by people (100% not a bot), or partially automated with some support from people (50% bot, 50% people – or any combination of bot/personal). Because I plan to use Many Chat – I chose the combo option.
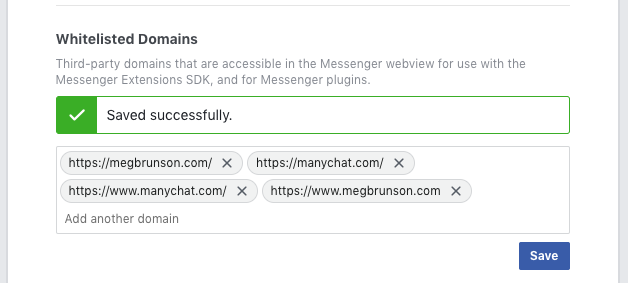
From this page, you can also reconfirm your whitelisted domains. Again, ensure you have your website listed twice – both with/without the www. Also ensure any domains tied to your bots are here. It's also important to note that you need to ensure that the http/https matches – so check your site to see which option is accurate for your website. If I had put “http” – it would not have worked, because my website is “https!”
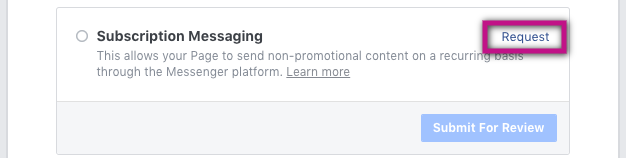
Finally, this is optional! If you wish to use Facebook Messenger to send subscription messaging, you can apply for that authorization. Facebook does NOT allow you to send promotional messages in this way, but you can send updates as they relate to news, productivity, and personal tracking.
The below image/description is taken directly from Facebook's Developer site:

(Read more about Subscription Messaging from Facebook)
Of course, I want that! So I clicked on the “request” button to begin my application!
The application is pretty straight forward. Simply fill out how you intend to use the feature, and promise them that you wont be promotional in your messages. No one likes spam – and if you abuse the feature, you'll likely lose it.
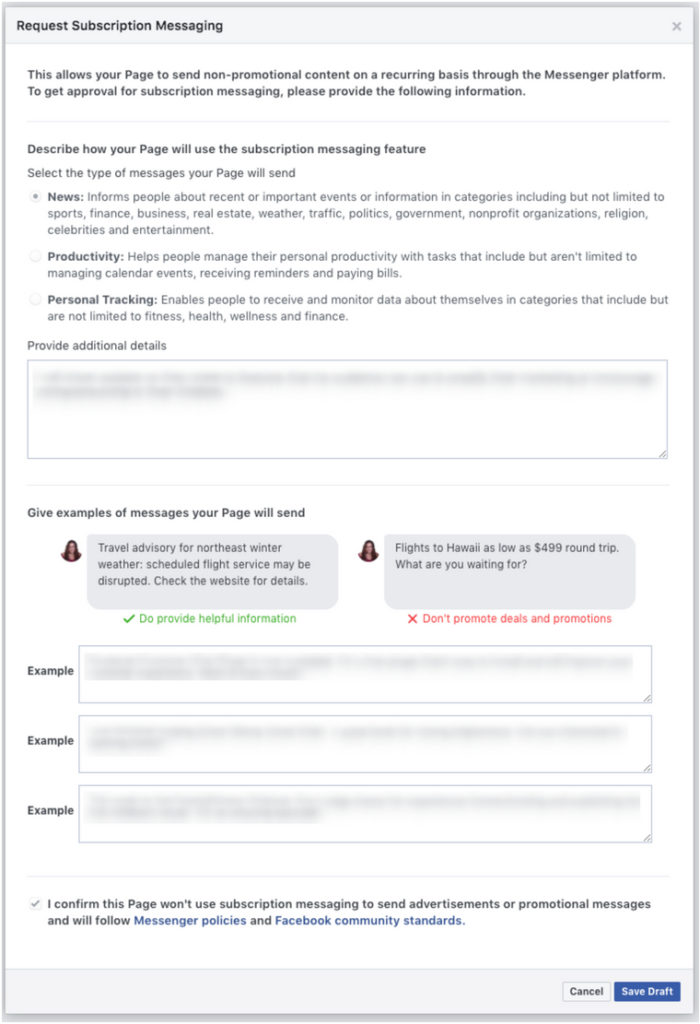
I loved that you can save the draft, then go back and continue working on it as needed. Once you are satisfied with how everything looks, go ahead and submit the application – then you'll simply have to wait for an approval, or the next steps if you are disapproved.

*note – if you are using a chat bot like Many Chat – this may not be necessary, since you can leverage the bot to send out similar subscription broadcasts. But if you are NOT using a bot, this is a really great way to deliver news, productivity tips, or personal tracking information to your subscribers!
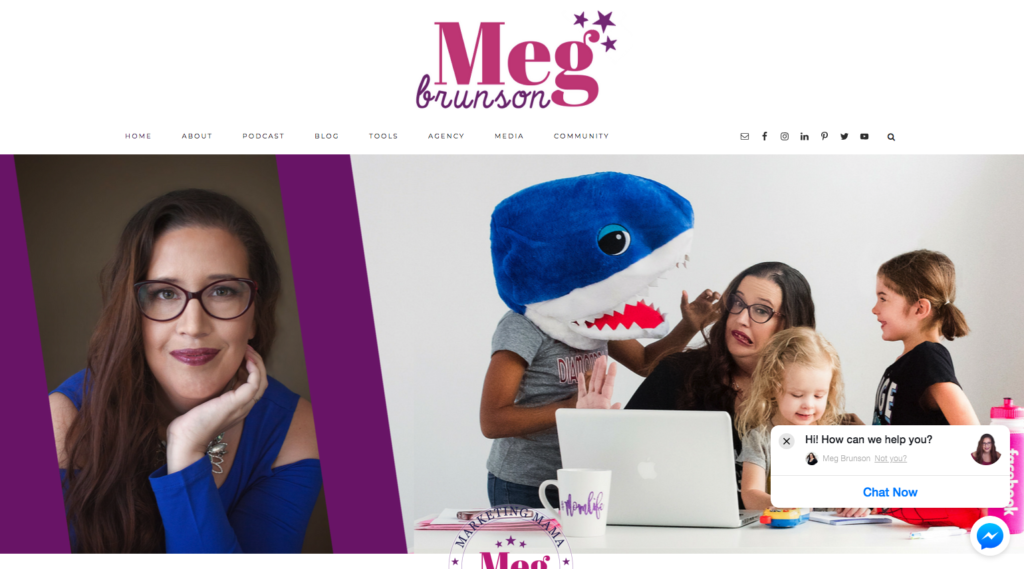
That's it! Check it out on your website!
Now, head over to your website and hit “refresh” and admire the Facebook Customer Chat plugin in the lower right hand corner of your screen!
I LOVE this feature so much – and can't wait to start some conversations with my website visitors and spend a little more time focusing on setting up my bot through ManyChat. Bots are going to be BIG in 2018, they were a big focus of Facebook's developer conference this year – read more about what they announced at F8 2018, here!